I'd like to just use pure GDI at this time to avoid users having to install OpenGL/ DirectX to run the program. I'm sure most people have either one or the other, but I like the simplicity of GDI as it pretty much offers everything I need. If I ever get to writing a raycaster or voxel engine, I'd probably go with OpenGL. Thanks for the example, I'll give it a look!
🎉 Celebrating 25 Years of GameDev.net! 🎉
Not many can claim 25 years on the Internet! Join us in celebrating this milestone. Learn more about our history, and thank you for being a part of our community!
Win32 GDI - Need help Adding a bitmap to this example
Hi, I'm new here! Nothing is impossible with the Windows GDI. I am working on my own 2d game engine just for the purpose of fun and learning. If you really want to see what is possible, I make regular updates on my youtube channel.
Here is a video of me doing a test run!
And yes this is using straight Win32 GDI. I have been working on this for about 1 year so it takes considerable time. You will be met with many challenges. There are a lot of things I had to figure out but that's what makes it fun!
I'm not using any graphics libraries, it's just all raw gdi and the background music and jumping sound effects are being played by a separate program I created that launches instances of Playsound, my game engine talks with it and tells it what to play, works really well.
Best;
Rafael
Hello! I totally agree! It is enjoyable seeing everything coming together, piece by piece. Sometimes I'm stuck for days or more on a problem, but finding the solution makes it all worth it in the end.
I've actually seen your work quite recently on YouTube. I'm very impressed and must say that it's quite possibly the most polished work using GDI only that I've seen to this point. Although I'm not going to do anything so expansive or complex, It is cool to see what can be done with GDI.
Airbatz said:
Hello! I totally agree! It is enjoyable seeing everything coming together, piece by piece. Sometimes I'm stuck for days or more on a problem, but finding the solution makes it all worth it in the end.
I've actually seen your work quite recently on YouTube. I'm very impressed and must say that it's quite possibly the most polished work using GDI only that I've seen to this point. Although I'm not going to do anything so expansive or complex, It is cool to see what can be done with GDI.
Great to hear! The problem solving is really why I embarked on this project, I had to figure out jump algorithms, game cycles to keep the game running at the same speed across different computers, how to use a back buffer with the gdi .. my first attempts were total failures but I NEVER gave up, every day I experimented with a ton of things and then I would sit down and figure out how to squeeze every last ounce of performance to see what I could and could not do. It has been exciting from the start and it feels so good to know that it is all my hard work and dedication.
Hopefully, I can figure out the final requirements for my own current project and get it finished. It's nothing big, but better to do it right than release something half-baked. GDI has so many different ways of going about things, I spend more than half of the time experimenting, lol.
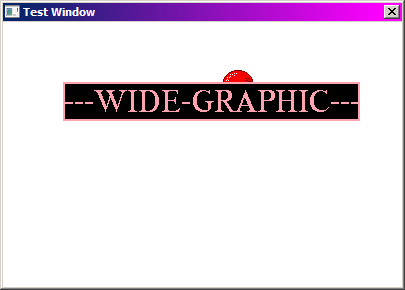
Going back to my initial question. Since I switched over to using BitBlt and making the background pic a smaller masked image to reduce filesize, it refuses to work with the animation. About 12 hours later of trying to find a solution, I'm probably overlooking something obvious. The below code is supposed to draw the ball sprite, bouncing around the window while the background image is shown. So far, both are being drawn, but with black backgrounds. The ball also has a part of the background on it which IS transparent, for some reason.
void DrawBall(HDC hdc, RECT* prc)
{
	HDC hdcBuffer = CreateCompatibleDC(hdc);
	HBITMAP hbmBuffer = CreateCompatibleBitmap(hdc, prc->right, prc->bottom);
	HBITMAP hbmOldBuffer = (HBITMAP)SelectObject(hdcBuffer, hbmBuffer);

	HDC hdcMem = CreateCompatibleDC(hdc);
	HBITMAP hbmOld = (HBITMAP)SelectObject(hdcMem, g_hbmMask);

	FillRect(hdcBuffer, prc, (HBRUSH)GetStockObject(WHITE_BRUSH));

	HBITMAP hbmOld2        = (HBITMAP)SelectObject( hdcMem, g_hbmTitle );
        BitBlt( hdcBuffer, 0, 0, prc->right, prc->bottom, hdcMem, 0, 0, SRCCOPY );

	BitBlt(hdcBuffer, g_ballInfo.x, g_ballInfo.y, g_ballInfo.width, g_ballInfo.height, hdcMem,
	0, 0, SRCAND);

	SelectObject(hdcMem, g_hbmBall);
	BitBlt(hdcBuffer, g_ballInfo.x, g_ballInfo.y, g_ballInfo.width, g_ballInfo.height, hdcMem,
	0, 0, SRCPAINT);

	BitBlt(hdc, 0, 0, prc->right, prc->bottom, hdcBuffer, 0, 0, SRCCOPY);

	SelectObject(hdcMem, hbmOld);
	DeleteDC(hdcMem);

	SelectObject(hdcBuffer, hbmOldBuffer);
	DeleteDC(hdcBuffer);
	DeleteObject(hbmBuffer);
}@Airbatz If you want the ball to be transparent, you have to take another route, your technique is how I used to do it but on my 2d game engine, if I was creating an asset, it looks something like this, you may be able to use some of the code and adapt it to your code.
// Macro for transparency color
#define chromakey RGB(100,100,100)

HDC hdc = NULL; // global DC for easy access
from my back buffer class
void BACKBUFFER2D::create(float f_width_, float f_height_)
// Prepares the back buffer surface for use.
{
    // save the back buffer size
	f_width=f_width_; f_height=f_height_;

	// create back buffer object
	backbuffer=CreateCompatibleDC(hdc);
	hbbackbuffer=CreateCompatibleBitmap(hdc,f_width,f_height);
	oldObject=SelectObject(backbuffer,hbbackbuffer);
}
This function from a class creates an asset,
void BITMAP2D::createasset(int i_width, int i_height, COLORREF cfColor)
// creates a bitmap of the specified width and height and fills it with cfColor.
{
    if(b_havebitmap) return; // we already have a bitmap!
    hbitmap=CreateCompatibleBitmap(hdc,i_width,i_height); // create bitmap surface
    GetObject(hbitmap,sizeof(bitmap),&bitmap); // get bitmap information
    hdcbuffer=CreateCompatibleDC(hdc); // create compatible dc from client
    oldObject = SelectObject(hdcbuffer,hbitmap); // select bitmap into buffer
    RECT rect = { 0, 0, i_width, i_height }; // create a rect
    FillRect(hdcbuffer,&rect,CreateSolidBrush(cfColor)); // paint with cfColor
    b_havebitmap=true; // we now have a bitmap!
}
I paint the sprite not using BitBlt() but by using a function from a library that you might already have in your compiler, it is called TransparentBlt() and works beautifully, instead of creating a mask for your ball, you can simply choose which color you want to make transparent.
void BITMAP2D::paintsp(HDC hdc_surface,
float x,float y,int i_width,int i_height,int i_xbitmap,int i_ybitmap)
// draws a section of the bitmap tile surface using the transparency macro.
{
    if(!b_havebitmap) return; // no bitmap

    TransparentBlt(hdc_surface, // destination device
        x,y, // destination position
        i_width,i_height, // dimensions
        hdcbuffer, // source device
        i_width*i_xbitmap, // source x position
        i_height*i_ybitmap, // source y position
        i_width,i_height, // source dimensions
        chromakey); // transparency macro
}
Then free up the resources,
BITMAP2D::~BITMAP2D()
// destructor cleans up
{
    DeleteObject(hbitmap);
    DeleteDC(hdcbuffer);
    SelectObject(hdcbuffer,oldObject);
}
BACKBUFFER2D::~BACKBUFFER2D()
// class destructor
{
DeleteDC(backbuffer);
DeleteObject(hbbackbuffer);
SelectObject(backbuffer,oldObject);
}I can post my BACKBUFFER and BITMAP2D classes here if you want to full around with them. When I created those two classes, my nightmares of allocating resources for the GDI were out the window.
To use TransparentBlt() you just need to include the “winmm” library. The final drawing operation is handled by the viewport class which renders the individual bitmap surfaces to the back buffer and then calls BitBlt() to paint the result.
// paint the background type to the back buffer
background.paintbk(backbuffer.get(),f_xbbIndex,f_ybbIndex,i_width,i_height);
// paint something else
// and some other thing…
// copy the back buffer contents to the window DC
BitBlt(hdc,x,y,i_width,i_height,backbuffer.get(),f_xbbIndex,f_ybbIndex,SRCCOPY);Let me know if you've made any progress or if you were able to find the problem. I think I know where your problem is but I'm going to keep quiet to see if you can spot it. 12 hours is a long time!
Thanks for the code. If you could post your classes, I'm sure I'll learn a thing or two from them! Endurion used TransparentBlt in his example as well and it works fine, but I'd like to know exactly what's wrong with my code. The reason I didn't go immediately with TransparentBlt was due to performance, but as Endurion indicated, it's likely irrelevant. I did make some progress on the problem. I believe it has to do with the drawing area of both graphics overlapping which caused one of them to be obscured and flickering. Following from this, both are being drawn to the screen with no flicker, but only the ball has a working mask. The remaining issues are that the background graphic is being drawn with a solid black mask, rather than with transparency. The ball sprite is also going behind the graphic, which is the wrong z-order. 12 hours is indeed long, but if the problem is solved, it's well-spent ?

There is absolutely no performance hit when using TransparentBlt() it works exactly like BitBlt() but has the added ability to ignore a pixel of a certain color. You have seen my 2d game engine before, all surfaces are painted using TransparentBlt() and the final call is done with BitBlt() The way you are doing it requires an extra step when using SRCAND, when your scenes become more saturated, you will start to notice a performance hit.
Here are the two classes and then I'll tell you how to use them. I know you're supposed to separate them in two files but I don't bother with that since I'm constantly improving the classes.
BACK BUFFER class
#ifndef BACKBUFFER2D_H
#define BACKBUFFER2D_H
/*
____ ____ __ __ _ ____ __ __ _____ _____ ___ ____
| \ / | / ]| |/ ]| \ | | || || |/ _]| \
| o )| o | / / | ' / | o )| | || __|| __/ [_ | D )
| || |/ / | \ | || | || |_ | |_| _]| /
| O || _ / \_ | \| O || : || _] | _] [_ | \
| || | \ || . || || || | | | | || . \
|_____||__|__|\____||__|\_||_____| \____||__| |__| |_____||__|\__|
Backbuffer class, Copyright (c) 2019 Rafael Santana
A class to allocate the necessary resources to create a back buffer
to implement double-buffering for the 2d game.
*/
class BACKBUFFER2D
{
public: // class interface
void create(float,float);
~BACKBUFFER2D(); // destructor
// getter functions
HDC get() { return backbuffer; }
float getwidth() { return f_width; }
float getheight() { return f_height; }
private:
float f_width; // width of back buffer
float f_height; // height of back buffer
HDC backbuffer; // device context
HBITMAP hbbackbuffer; // bitmap handle
HGDIOBJ oldObject; // original object
};
BACKBUFFER2D::~BACKBUFFER2D()
// class destructor
{
    DeleteDC(backbuffer);
    DeleteObject(hbbackbuffer);
    SelectObject(backbuffer,oldObject);
}
void BACKBUFFER2D::create(float f_width_, float f_height_)
// Prepares the back buffer surface for use.
{
// save the back buffer size
f_width=f_width_; f_height=f_height_;
// create back buffer object
backbuffer=CreateCompatibleDC(hdc);
hbbackbuffer=CreateCompatibleBitmap(hdc,f_width,f_height);
oldObject=SelectObject(backbuffer,hbbackbuffer);
}
#endif // BACKBUFFER2D_HBITMAP2D CLASS
#ifndef BITMAP2D_H
#define BITMAP2D_H

/*
     ____   ____  ______  ___ ___   ____  ____    _____
    |    \ |    ||      ||   |   | /    ||    \  / ___/
    |  o  ) |  | |      || _   _ ||  o  ||  o  )(   \_
    |     | |  | |_|  |_||  \_/  ||     ||   _/  \__  |
    |  O  | |  |   |  |  |   |   ||  _  ||  |    /  \ |
    |     | |  |   |  |  |   |   ||  |  ||  |    \    |
    |_____||____|  |__|  |___|___||__|__||__|     \___|

    Bitmap resources, Copyright (c) 2019 Rafael Santana

    A class to represent bitmaps as objects. Allows loading of bitmaps from disk
    and allocating the necessary resources to display the bitmap surface.

    paintsp; used for drawing sprites in the 2d game.
    paintbk; usually used for painting the background layer.
    blendsp; used for alpha blending effects

    Note: The hdc is a global variable in game2d.h
*/

class BITMAP2D
{
    public: // class interface
    ~BITMAP2D(); // destructor

    void loadasset(string);
    void createasset(int,int,COLORREF);
    void blendsp(HDC,float,float,int,int,int,int,BYTE);
    void paintsp(HDC,float,float,int,int,int,int);
    void paintbk(HDC,float,float,int,int,float,float);

    // getter functions
    int getwidth() { return bitmap.bmWidth; }
    int getheight() { return bitmap.bmHeight; }
    string getfilename() { return sg_filename; }
    HDC getsurface() { return hdcbuffer; }

    private:
    HDC hdcbuffer; // handle to device
    HBITMAP hbitmap; // bitmap handle
    BITMAP bitmap; // bitmap surface
    HGDIOBJ oldObject; // to store original object
    BLENDFUNCTION blendFt; // used by alpha blend
    string sg_filename; // filename used

    bool b_havebitmap = false;
};

BITMAP2D::~BITMAP2D()
// destructor cleans up
{
    DeleteObject(hbitmap);
    DeleteDC(hdcbuffer);
    SelectObject(hdcbuffer,oldObject);
}

void BITMAP2D::loadasset(string filestr)
// loads bitmap from disk and allocates necessary resources.
{
    if(b_havebitmap) return; // we already have a bitmap!
    sg_filename=filestr; // store the files name for later use
    hbitmap=(HBITMAP)LoadImage(NULL,filestr.c_str(),IMAGE_BITMAP,0,0,LR_LOADFROMFILE);
    GetObject(hbitmap,sizeof(bitmap),&bitmap); // get bitmap information
    hdcbuffer=CreateCompatibleDC(hdc); // create compatible dc from client
    oldObject = SelectObject(hdcbuffer,hbitmap); // select bitmap into buffer
    b_havebitmap=true; // we now have a bitmap!
}

void BITMAP2D::createasset(int i_width, int i_height, COLORREF cfColor)
// creates a bitmap of the specified width and height and fills it with cfColor.
{
    if(b_havebitmap) return; // we already have a bitmap!
    hbitmap=CreateCompatibleBitmap(hdc,i_width,i_height); // create bitmap surface
    GetObject(hbitmap,sizeof(bitmap),&bitmap); // get bitmap information
    hdcbuffer=CreateCompatibleDC(hdc); // create compatible dc from client
    oldObject = SelectObject(hdcbuffer,hbitmap); // select bitmap into buffer
    RECT rect = { 0, 0, i_width, i_height }; // create a rect
    FillRect(hdcbuffer,&rect,CreateSolidBrush(cfColor)); // paint with cfColor
    b_havebitmap=true; // we now have a bitmap!
}

void BITMAP2D::blendsp(HDC hdc_surface,
float x,float y,int i_width,int i_height,int i_xbitmap,int i_ybitmap,BYTE byte_blend)
//  draws the requested bitmap tile with a translucent effect
{
    if(!b_havebitmap) return; // no bitmap

    blendFt = { 0, 0, byte_blend, 0 }; // blend function

    AlphaBlend(hdc_surface, // dest surface
               x,y, // dest x and y
               i_width,i_height, // dest dimensions
               hdcbuffer, // src surface
               i_width*i_xbitmap, // src x position
               i_height*i_ybitmap, // src y position
               i_width,i_height, // src dimensions
               blendFt); // blend function
}

void BITMAP2D::paintsp(HDC hdc_surface,
float x,float y,int i_width,int i_height,int i_xbitmap,int i_ybitmap)
// draws a section of the bitmap tile surface using the transparency macro.
{
    if(!b_havebitmap) return; // no bitmap

    TransparentBlt(hdc_surface, // destination device
        x,y, // destination position
        i_width,i_height, // dimensions
        hdcbuffer, // source device
        i_width*i_xbitmap, // source x position
        i_height*i_ybitmap, // source y position
        i_width,i_height, // source dimensions
        chromakey); // transparency macro
}

void BITMAP2D::paintbk
(HDC hdc_surface,float x,float y,int i_width,int i_height,float f_xindex, float f_yindex)
// Mimics a viewport by drawing a section of the bitmap at the requested
// location by using the index values as the offset to draw from.
{
    if(!b_havebitmap) return; // no bitmap

    TransparentBlt(hdc_surface, // destination device
        x,y, // destination position
        i_width,i_height, // width & height
        hdcbuffer, // source device
        f_xindex,f_yindex, // source y position
        i_width,i_height, // source height
        chromakey); // transparency macro
}

#endif // BITMAP2D_H
So how to use them? In your main.cpp file
#include “backbuffer2d.h”
#include “bitmap2d.h”

// Macro for transparency color
#define chromakey RGB(100,100,100)

PAINTSTRUCT ps = { 0 }; // your typical paint struct
HDC hdc = NULL; // global DC for easy access

// create objects
BACKBUFFER2D backbuffer;
vector<BITMAP2D>bitmap(2);
Then in your Window procedure,
case WM_CREATE: // Prepare the game.
        {
            hdc=GetDC(hWnd); // get window device

            // bitmap assets
            bitmap[0].loadasset(".\\some_background.bmp");
            bitmap[1].loadasset(".\\some_sprite.bmp");

            // back buffer dimensions
            backbuffer.create(1280,720);


            ReleaseDC(hWnd,hdc); // release window device

            break;
        }
And finally in your PAINT section,
case WM_PAINT: // Paint the game
        {
		hdc = BeginPaint(hWnd,&ps);

		// paint the background to the back buffer
		bitmap[0].paintbk(backbuffer.get(),0,0,1280,720,0,0);

		// now paint the sprite somewhere
		bitmap[1].paintsp(backbuffer.get(),100,100,100,100,0,0);

		// present the back buffer to the window DC
		BitBlt(hdc,0,0,1280,720,backbuffer.get(),0,0,SRCCOPY);

		EndPaint(hWnd,&ps);

		break;
        }
If you set it up correctly and give it a background bitmap and another bitmap that is 100x100 in dimensions, it will draw the background and place the other bitmap at co-ordinates 100,100 and if you paint a section of the bitmap in RGB colors 100,100,100 it will use that as the transparent color. You can change the color in the define section above to what ever you like.
I know this is a lot of code, very sorry. My ways are not the best way and certain there is room for improvement here and there but those two classes right there are the heart of my 2d game engine, of course there is the sprite class but there is wayyyyyy to much code in that one to post on here.
I highly recommend you write some classes while working on your example so that you won't have to start from scratch every single time. That way you can focus on the “engine” that is delivering your presentation and you can make improvements at the core level while still continuing your research with different techniques.
Great stuff! It gives me a few ideas for my own code. I haven't used used classes before in anything, but they keep coming up, so I'll have to do some reading I guess. I am now using TransparentBlt and it is working flawlessly. With that out of the way I can work on managing the way I've written the program a little better ?


